Based on survey results and other feedback, we will improve upon this Alpha version for a Beta.
3.6.2 Set up a Team Wall
Having a central place to communicate, manage your work, and collaborate with the team is an essential component to the success of an agile project. When planning an agile digital service, creating a team wall is an important activity that provides a place to capture and document the team’s work.
A team wall can be defined as: a visual approach to displaying the work that the team can easily see. At a high level this includes work that is: “not started,” “in progress,” and “done.”
The following sections will explain how a team wall can be used to plan and track the status of an iteration. Team walls, however, can also be used to manage information about many different types of work by the team, such as:
- The release plan
- The product vision
- The product roadmap
- Sharing user research
- Sharing profiles of your team members.
If your team is relatively new to agile, create a physical team wall first, instead of a virtual one. Using a physical wall will help increase collaboration and efficiency among the team, and also makes the team’s progress easy to see to others involved on the periphery of the team.
Depending on the space available or where the team is working, a physical wall, side of a cubicle, closed window, or a white board can be used. Once a team is more proficient and comfortable with agile practices or only if the team cannot work in a shared location, then using an online wall is an option.
Beginners Should Start with a Physical Team Wall, not a Virtual Wall
If you’re new to agile, beginning with a physical team wall is the preferred approach. Setting up a physical has the following benefits:
- Telling a story at a distance that is focused on the big picture across all team activities
- The visual nature consistently re-focus the team on the most important things
- Providing unavoidable information to all team members about progress and work outstanding
- Providing a high degree of individual satisfaction via the hands-on aspects of physically moving tasks across the board to “Done”
- Being highly visible outside of the immediate team, helping generate enthusiasm and buy-in throughout the organization
How Team Walls Work
Depending on the size of the team wall and scope of the project, you will typically use the team wall to track progress on your project. Generally, team walls are used to track:
- Work the team is currently doing
- Work the team has not started yet
- Work that is done
For projects with many iterations, a team wall may be used to track each story or task that will be included as part of each individual iteration. In these cases, once the iteration is complete, the team wall may be re-set with the new stories or tasks for the next iteration.
For smaller projects, the team wall may be used to track the status of each story or task across the entire project. Individual pieces of work or tasks (user stories) are written down on a note card or sticky note and stuck to the wall. These notes are then placed in different columns to show where that specific task resides and as the work progresses they move across the wall.
Team walls help the team to:
- Manage the work you’ve agreed to do
- Share the big picture of what work is currently underway
- Encourage communication and collaboration in your team, and with the rest of the organization
- Promote conversations among the team to understand important dependencies between pieces of work
You should also use the wall to track:
- Progress against your goals
- Any risks and issues you’ve found
- Major obstacles to delivery, things which are stopping you getting work done (these are sometimes called “blockers” or “impediments”)
- Important deadlines and milestones
Ideally, the team walls should go in a prominent place near the team’s workspace so that everyone in the team can see them and update them easily. Yet, starting and setting up a team wall is just the beginning. The team wall should then be reviewed often to make sure it is up to date. If tasks are not being moved as new information is known about status, then the value of this tool is greatly reduced. Having an up-to-date wall also allows you to:
- Have a physical focal point for the team to look at and comment on during standups and other status and planning meetings
- Promote transparency and enthusiasm outside the project team by publicly showing others in your organization the status of the work
- Facilitate decisions based on an accurate overview of the work
- Spot potential problems more easily that may delay the work
What to Put on the Team Wall
The team wall should include all stories or tasks the team has agreed to complete, either during an iteration or those that must be completed during the entire effort.
Components of a Team Wall
A team wall should include a main set of columns, however, depending on the nature of the project more columns may need to be added. Each of these columns will represent a place in time of where a specific story or task is located. Figure 1-1 depicts a team that includes five columns. These columns are:
- Backlog (Product Backlog): Collection of all stories or tasks that are to be worked on during the project
- Not Started (Iteration Backlog): Stories or tasks that have been prioritized to be worked during the current iteration
- In Progress: Stories or tasks that have been started, but not completed
- Review: Stories or tasks where the work has been completed, but has not yet been reviewed and validated as being done
- Done: Stories or tasks where the Product Owner has reviewed and signed off
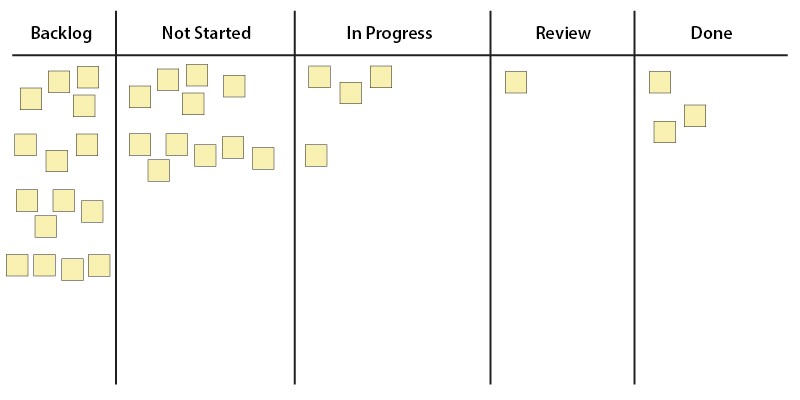
Figure 1-1
Additional columns that can be included are:
- Analysis
- Development
- Testing
- Defect
- Blocked/impediment
- Peer review
- Deployed
A team might choose to add these columns to provide more useful detail for the specific flow of a story or task. The names and types of columns that are used will always depend on the organization, project, and the experience and preferences of the team. When adding an extra column, just like with any other change to your team’s agile process, consider how it might help or hinder the team’s ability to deliver valuable software quickly and frequently to your users.
Assigning Work with a Team Wall
Keeping track, assigning, and managing work with a team wall can be done in a variety of ways. Rows can be created for each member of the team, different color cards or notes can be assigned to each team member to indicate task ownership, or the assignees name can be marked on the cards. In this way, the team wall can also serve as an informal version of a Responsibility Assignment Matrix or RACI for a subset of project tasks by identifying and tracking the responsibilities held by each person. Figure 1-2 shows an example of using rows to identify team members and track their associated work.
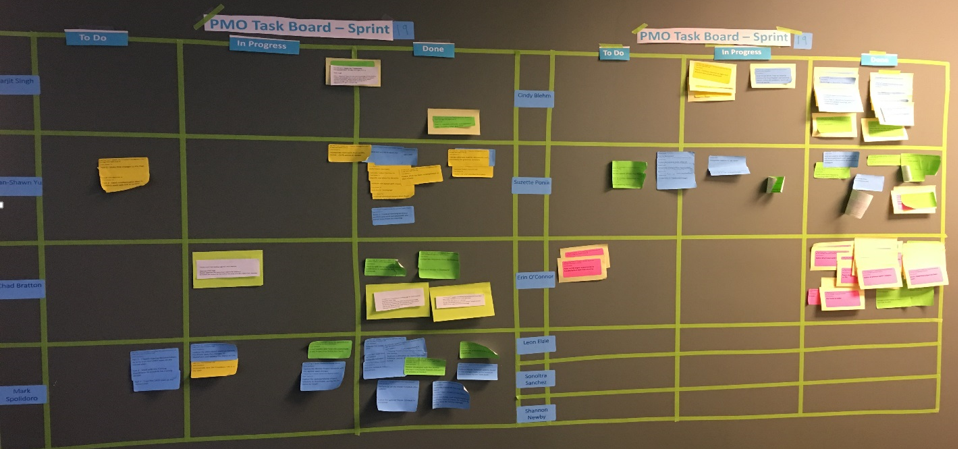
Figure 1-2
There are many benefits to leveraging the row approach. One is in case the specific task moves to a different team member. Others include:
- Being able to quickly and visually gauge the progress of the iteration
- Seeing who is potentially overloaded
- Allowing for those that have completed their tasks or assignments to take additional items from the backlog that they can complete in the current iteration
Using a team wall similar to this will help the team to see the distribution of work across each team member at a glance. This is also helpful in improving team productivity and managing allocation of resources.
Playbook Contents
Updated: September 22, 2017